REVIEW · ANDALSNES
Geiranger: Sky to Fjord Downhill Biking Adventure
Book on Viator →Operated by Excursions.no · Bookable on Viator
Fjord views. Gravity. Repeat. I love the 16 km downhill run and how the scheduled viewpoint stops (especially Flydalsjuvet) turn a simple ride into a photo-filled, adrenaline hit; I also like that you get bike, helmet, gloves, and a safety vest plus an air-conditioned ride up to the start. The main drawback to consider: this is unguided, so you’re responsible for your pacing and bike control on a road that can have big vehicles around you.
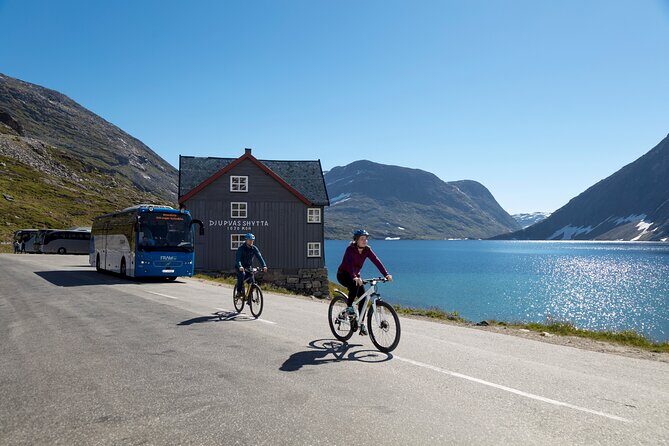
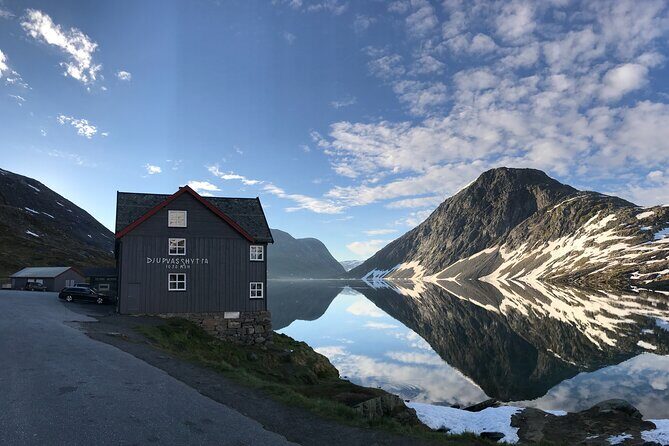
Before you set off, you’ll be transported up to Djupvatn Lake, about 1,030 meters above sea level, where the real fun begins. You’ll get technical and safety instructions, and then you’re given the freedom to cruise down at your own pace with time for stops and pictures.
This is built for people with at least moderate fitness. You’re mostly coasting downhill, but there’s at least one small uphill pedal section that can catch you off guard if you’re expecting an all-gravity ride.
In This Review
- Key Highlights You’ll Care About
- Entering Geiranger’s Downhill Zone
- Getting Up to Djupvatn Lake (Why the Climb Is Part of the Value)
- The Descent Itself: What 16 km of Gravity Feels Like
- Viewpoint Stops You’ll Actually Notice
- Flydalsjuvet (Your first major stop)
- Blåfjell viewpoint and the Fjord-Mountain Mix
- Kvandalls waterfall
- Opplenskedalen Valley
- Knuten
- Unguided Riding: Freedom With Real Responsibility
- Your Bike Setup and Safety Gear: What to Check Fast
- Road Realities: Should You Expect Buses and Narrow Space?
- Price and Value: Is $160.09 Worth It?
- Who This Ride Suits Best (And Who Might Not)
- Timing, Weather, and Planning Your Day in Geiranger
- Should You Book This Downhill Bike Adventure?
- FAQ
- Where does the activity start and end?
- How long is the downhill biking experience?
- How far do you bike downhill?
- Where do you start biking from?
- Is there a guide during the ride?
- What gear is included?
- Is there transportation provided?
- What viewpoint stops are included?
- Do I need moderate fitness?
- What happens if weather is bad?
- What group size should I expect?
Key Highlights You’ll Care About
- 16 km descent from Djupvatn Lake area with big scenery energy
- Flydalsjuvet as the first major stop and a big highlight along the way
- Provided helmet, gloves, and visibility vest so you start safer
- Unguided riding means you’ll manage your own stops and pace
- Small group size (max 6 travelers) keeps things from feeling chaotic
Entering Geiranger’s Downhill Zone
This ride is all about one thing: dropping down one of Norway’s most famous fjord roads on a real downhill bike. You’re not wandering around a town with a bike. You’re hitting the mountain-to-fjord line where the views get dramatic fast and the speed feels legit.
I especially like the mix of adrenaline and “stop whenever” freedom. You get a plan (pickup, equipment, safety instructions, set photo stops), but you don’t have a guide pacing you like a human metronome. That matters in Geiranger, where weather can change and the light can get sharp and gorgeous for about five minutes at a time.
You can also read our reviews of more tours and experiences in Andalsnes.
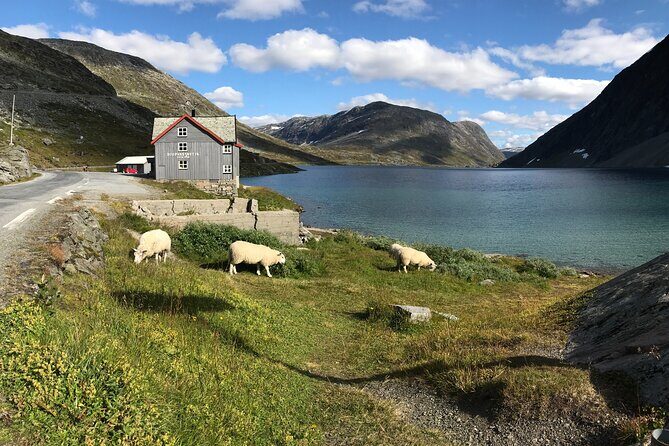
Getting Up to Djupvatn Lake (Why the Climb Is Part of the Value)
Your day starts with a drive to Djupvatn Lake, roughly 1,030 m above sea level. That uphill transport is not just convenience—it’s what makes the whole experience possible. You’re not negotiating a brutal climb on your own legs. You show up, get set, and then you point the bike downhill.
You’ll ride in an air-conditioned vehicle. In Norway, weather is moody, and even when it’s comfortable outside, a cool cabin helps take the edge off right before you start. Also, with a small maximum group size (6), the drive doesn’t feel like a long cattle-call.
One more practical note: because you’re starting high, you’ll feel the temperature difference. Even if it’s warm down in Geiranger village, the top can feel cooler and windier. I’d dress like you’ll need one extra layer for a few minutes.
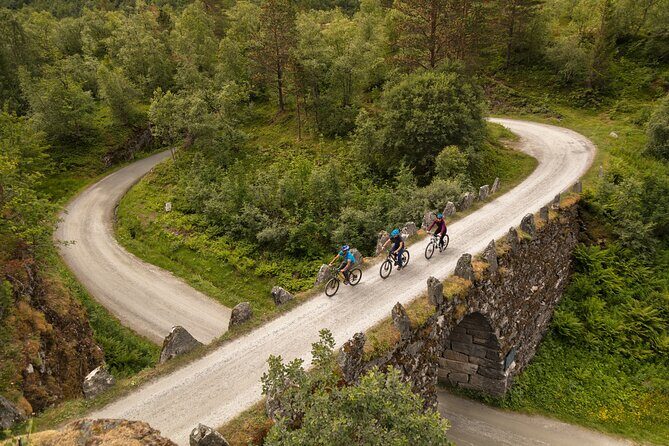
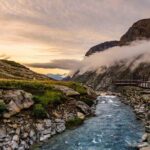
The Descent Itself: What 16 km of Gravity Feels Like
The downhill covers about 16 km. That distance is long enough to feel like an event, not a quick thrill ride. You’ll have multiple spots to pull over for photos and viewpoint breaks, which keeps your brain engaged rather than just counting seconds until you reach the bottom.
Expect the ride to be mostly downhill, but don’t plan as if you’ll never need to pedal. One small uphill section can pop up, and it’s enough that you might choose to walk a part rather than fight for momentum.
The big “mental trick” is this: don’t treat it like a race. The views are the point. If you ride too hard early, you’ll spend the rest of the descent white-knuckling rather than enjoying it. The best rides here come from smooth braking and planning your line.
Viewpoint Stops You’ll Actually Notice
This ride gives you a series of scenic breaks, not random pull-offs. Each stop is designed to give you a new angle on the fjord, mountains, waterfalls, and the road itself.
Here’s what you can expect along the way:
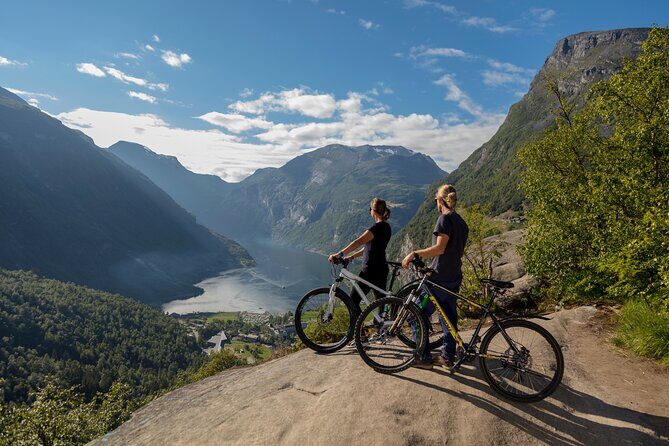
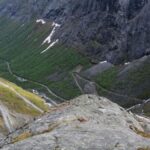
Flydalsjuvet (Your first major stop)
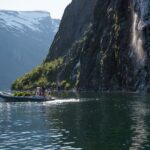
Flydalsjuvet is the most famous stop on this route, and it shows up early in the descent sequence. This is the moment many people are waiting for—the viewpoint that makes you stop even if you normally hate stopping.
Even if you’re not a big photo person, you’ll want to be there with your camera ready. The drop-off and scenery combination is the kind of thing that makes your brain go quiet.


Blåfjell viewpoint and the Fjord-Mountain Mix
You’ll also reach a viewpoint near the foot of Blåfjell mountain. This is one of those stops where you can appreciate how the road threads through the steep terrain. It’s less about one single dramatic frame and more about understanding the geography.
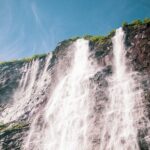
Kvandalls waterfall
Kvandalls waterfall is one of the scenic stops built into the ride. Water here changes with weather, so if it’s a clear day, you’ll get sharp views. If it’s mistier, the waterfall can look softer and more atmospheric.
Opplenskedalen Valley
Opplenskedalen Valley is another stop where the “scale” hits. You’re going downhill, but you’re also stepping visually through a series of natural rooms—mountain sides, open stretches, and the fjord horizon.
Knuten
Knuten is another named viewpoint stop you’ll be able to pause at. This is a good place to take a breather, reset your braking habits, and check how you feel. If you’re traveling with someone who’s less confident, this can be where you both regroup.
Unguided Riding: Freedom With Real Responsibility
This is a key point: there’s no guiding during the bike ride. You get instructions and safety talk before you start, but once you’re downhill, you’re on your own.
That’s great for people who hate rigid pacing. It’s less great if you’re new to handling a loaded downhill bike or if you’re expecting someone to manage the road for you. You’ll also want to be ready for stops to happen because you choose to stop, not because a guide turns you like a shopping trolley.
Traffic is another consideration. This is a public road. Some sections don’t feel like you’re riding on a protected bike path. Big vehicles may be close. The good news is that the road situation often works with cyclists when everyone stays predictable. The bad news is you can’t assume you’ll get a wide shoulder.
So I’d ride like a careful adult: keep your speed controlled, plan your braking early, and avoid sudden moves near pull-offs.
Your Bike Setup and Safety Gear: What to Check Fast
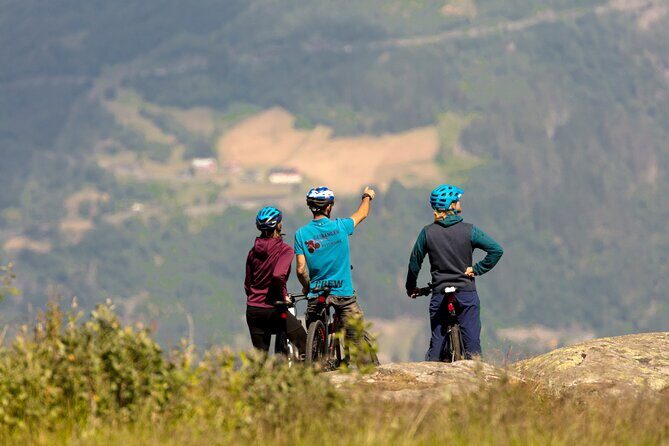
You do get safety gear and a bike setup included:
- Bike
- Helmet
- Bicycle gloves
- Visibility vest
That’s a strong baseline. The helmet and vest help, and gloves are a big deal when you’re braking on a downhill. Still, since the ride is unguided, small bike problems can matter more than they would on a guided experience.
Here’s what I’d do immediately after you get the bike:
- Check that your helmet fits comfortably and securely
- Make sure you can reach the brakes without stretching
- Test braking gently at a low speed before you settle into rhythm
- Confirm your seat height feels right for your legs
- Do a quick tire glance so you’re not surprised by traction
If anything feels off, speak up before you start coasting downhill. Once you’re rolling, fixing discomfort can become a juggling act.
One more practical tip: keep your body loose. On a downhill, your arms shouldn’t feel like you’re trying to hold a steering wheel in a storm. Let the bike move, keep your eyes up, and brake smoothly.
Road Realities: Should You Expect Buses and Narrow Space?

Because this is a well-known sightseeing road, you should expect normal road traffic—sometimes with big vehicles. That reality changes how you experience the downhill.
If you’re an experienced rider, you’ll likely find it manageable. If you’re a cautious rider, you can still have a great time, but you’ll want lower confidence translated into lower speed. Think “control first,” not “look fast.”
The upside? When you ride at a calm pace, the traffic often turns into part of the rhythm. You take your line, you pause where you need to, and you enjoy the views rather than constantly checking your nerves.
Price and Value: Is $160.09 Worth It?
The price is listed at $160.09 per person, with a duration of about 2 hours 30 minutes. That price can feel steep if you’re comparing it to casual bike rentals. But this isn’t just a rental.
You’re paying for:
- transportation up to the start (to Djupvatn Lake area)
- included downhill-ready equipment (bike + safety gear)
- safety and technical instructions before you ride
- structured scenic stops along a famous downhill route
- small-group setup (up to 6 travelers)
The best value happens when you treat it like what it is: a guided-feeling experience without a ride leader. You show up ready to ride, you take the safety talk seriously, and you use the included stops for photos and breaks.
The less-great value is for people who want a full guided service during the descent or who need frequent reassurance. Since guiding isn’t included, you’ll want to feel confident making decisions on the road.
Who This Ride Suits Best (And Who Might Not)
I think this downhill biking adventure fits best if you:
- want adrenaline but still enjoy photo stops
- are comfortable riding at your own pace
- have moderate fitness and can handle short pedaling when needed
- like “freedom with provided gear” rather than a guided lecture
It may be less suitable if you:
- hate riding on roads with mixed traffic
- need constant staff oversight while you ride
- are worried about bike fit issues (because you are responsible once you start)
There’s one interesting age-related note from the experience vibe: even older riders who took it easy reported that the ride worked well for them. That’s not a guarantee, but it suggests the downhill can be manageable when you choose a careful speed and you’re okay walking a small section if needed.
Timing, Weather, and Planning Your Day in Geiranger
Weather matters here. The activity requires good weather, and if conditions are poor, you’ll be offered another date or a full refund. That’s smart for a downhill bike ride where visibility, traction, and wind all play a role.
Plan your day with buffer time. The ride duration is about 2.5 hours, but your real time depends on how many photo stops you take and how long the ride team needs for instructions and equipment checks.
If you’re traveling on a cruise schedule, this can be a highlight. You’ll see the fjord from a road perspective most people never get. If you’re on a free day, it’s also a great centerpiece activity.
Also, this tour gets booked relatively early on average—around 74 days ahead. If your dates are set, I’d lock it in sooner rather than later.
Should You Book This Downhill Bike Adventure?
Book it if you want a real taste of Geiranger beyond viewpoints from the road—this is a ride that puts you in motion. The combination of provided safety gear, transport up to Djupvatn Lake, and multiple named photo stops makes it a strong use of a few hours.
Skip or shop around if you need a guided descent, you’re nervous about traffic exposure, or you’re worried about bike fit and braking performance. Since the ride is unguided, you’ll enjoy it most when you take control of your pacing and do a fast bike check before you start.
If you’re the type who likes to slow down on scenic stops and you can handle a public-road descent, this is one of those Norway activities that turns a normal day into a memory you’ll still talk about later.
FAQ
Where does the activity start and end?
It starts at Geirangervegen 10, 6216 Geiranger, Norway. The activity ends back at the same meeting point.
How long is the downhill biking experience?
The duration is about 2 hours 30 minutes (approx.).
How far do you bike downhill?
The downhill ride covers about 16 km.
Where do you start biking from?
You’re driven up to Djupvatn Lake, about 1,030 m above sea level, which is the biking starting point.
Is there a guide during the ride?
No. The ride takes place without the presence of a guide, though technical and safety instructions are provided.
What gear is included?
Included gear is the bike, helmet, bicycle gloves, and a visibility vest.
Is there transportation provided?
Yes. You’re transported to and from the biking location by an air-conditioned vehicle.
What viewpoint stops are included?
Stops include Flydalsjuvet and other viewpoints along the way, such as Kvandalls waterfall, Opplenskedalen Valley, Knuten, and a viewpoint at the foot of Blåfjell mountain.
Do I need moderate fitness?
Yes. Travelers should have a moderate physical fitness level.
What happens if weather is bad?
The activity requires good weather. If it’s canceled due to poor weather, you’ll be offered a different date or a full refund.
What group size should I expect?
The maximum group size is 6 travelers.